
Chimney Flashing Kit Instructions
Step 1:
Shingle up to and across the base of the chimney to a point where the tar-line is within at least 4 inches. Cut shingles to fit around the chimney base. Note: the shingle rows must continue to line up with the rest of the roof.
.
Step 2: 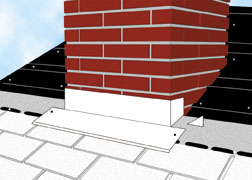
Center the base flashing along the chimney extending 3 to 4 inches past both ends of chimney. Cut a notch from both ends and wrap tabs around the chimney sides. Nail base flashing in place making sure nail heads will not be visible.
.
Step 3:
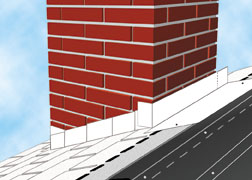
Using a step flashing, cut a notch as shown and bend tab around the front of chimney. Note: Step flashings are generally used to terminate a course of shingles at a wall, chimney or dormer and usually start at, or near the tar-line. Next, nail step flashing to the roof only and at a point where the nail head will be covered by the next shingle.
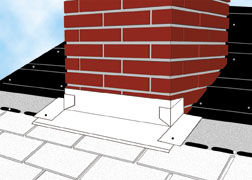
Step 4:
As in step 3, notch and install step flashing on opposite side of chimney and nail in place. Cut a shingle to fit over step flashings leaving approximately a 1/4″ to 1/2″ gap from the chimney for water drainage. Shingles installed on the opposite side of chimney should be cut to maintain the shingle water slot patterns. Once you clear the back of the chimney, the shingle courses must come together again as if the chimney never existed.
 Step 5:
Continue installing step flashings and shingles on both sides of chimney until shingle clears the back. Make sure shingle course meets back up with the shingle on opposite side. Note: When nailing shingles, the rule is to place the nail about 1 inch above the water slot or even with the tar line. This helps prevent nail head exposure to the weather while following the instructions of the shingle manufacturer.
Step 6: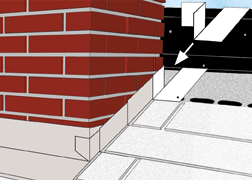
Cut notches and wrap the last step flashings on both sides of the top of the chimney and fit into place.
 Step 7:
Cut shingle to fit around the back of the chimney (cut may be snug with little or no gap).
Step 8: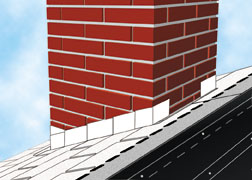
Finish installing shingle course across the back of the chimney. Make sure they line up with the roof courses and nail in place.
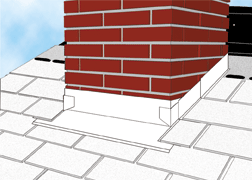
 Step 9:
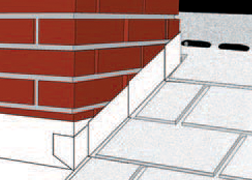
Center the cricket flashing along the back of the chimney extending 3 to 4 inches past both ends of chimney. Notch out both ends even with their respective corner and wrap tabs around the sides. Nail in place.
Step 10:
Complete the installation of shingles. Check your work thoroughly making sure there are no gaps or openings where ice & water may leak through.
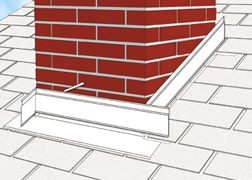
Counter flashings divert water over and away from the roof flashings and are only fastened to the masonry.
 Step 11:
Install counter flashings with tops aligned all the way around chimney. Starting with the sides, mark along the counter flashing tops leaving a small gap between the shingles and bottom of counter flashing for drainage. Align the tops of the front and back counter flashings with the tops of the side counter flashings and mark.
Step 12: 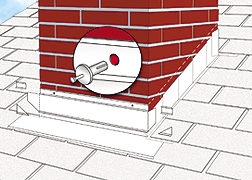
Cut the counter flashing ends as shown and fold them around the corner of the chimney. To prevent the metal from warping, cut away the top corners at the chimney corners then bend tbs around to sides. Install masonry fasteners through counter flashing and into chimney. Make sure the metal fits snug against brick.
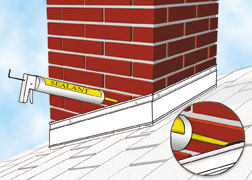 Step 13:
Mark rear counter flashing even along the chimney corners and place them along your mark. Install masonry fasteners. Check the tops of all 4 counter flashings to be sure each corner has a “V” notch. Caulk all 4 counter flashings along the V and at the corners. Make sure there are no gaps, bubbles or air pockets for water leakage.